|
|
|
|
|
|
|
|
Deployment - Sales Dashboard using AppFabric SDK for Java
|
|
|
|
|
|
|
|
Prerequisites
|
|
|
|
|
|
Demo Installation Guide
|
- If you haven't already done so, Download and configure the AppFabric SDK for Java Developers.

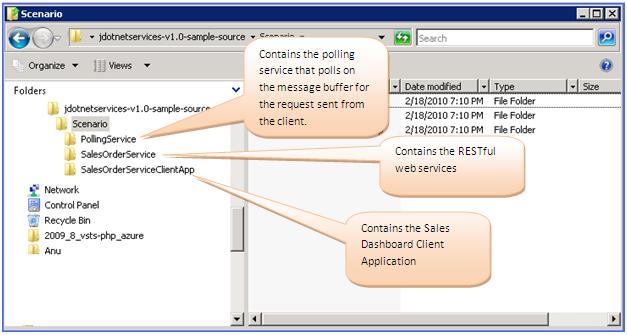
- Download and extract jdotnetservices-v1.0-sample-source.zip. This will create three folders
- SalesOrderService
- PollingService
- SalesOrderServiceClientApp

- The Demo requires a service namespace, management key, issuer key, policy key
and claims to be created on azure. The following steps explain how to create a
service namespace, keys and claims on azure:
- Login to AppFabric Devloper Portal using your live ID.
- Create a project by specifying a name e.g. JavaAppFabric.
- Once the project is created, Click on the project name to navigate to the project information Page.
- Click on 'Add Service Namespace' to create a new service namespace, give name e.g. appfabricsdkjava
- Once the service namespace is created, click on the 'Service Namespace' name to navigate to the service namespace information page.
- In this page you can see information such as Management key, service bus and access control end points.
- To create issuer key and policy key,
download and install Windows Azure platform AppFabric SDK.
- Go to C:\Program Files\Windows Azure platform AppFabric SDK\V1.0\Tools, Update the Acm.exe.config file,with service namespace and management key.
- Copy and paste SetUpSalesDashBoard.cmd to C:\Program Files\Windows Azure platform AppFabric SDK\V1.0\Samples \AccessControl\GettingStarted\ASPNETStringReverser
- From the command prompt run SetUpSalesDashBoard.cmd, this script will ask for your service namespace name and management key
This script will create and display the issuer key and policy key, notedown these
keys. This script also creates required claims for the SalesDashBoard application.
- Install the prerequisites.
- Follow the instructions listed below to configure the RESTful Sales Order Service (Creating SalesOrderService.war)
- Run the salesdashboard.sql file to create the database used by Sales Order Service.
- Open and edit the configuration file as below:
SalesOrderService/src/com/persistent/appfabric/sample/salesdataservice/config/configuration.properties.
- Define the database constants for current deployment
- MySQL server name as DB_HOST. e.g. DB_HOST = localhost
- MySQL port number as DB_PORT. e.g. DB_PORT = 3306
- MySQL user name as DB_USER. e.g. DB_USER = root
- MySQL password as DB_PASSWORD. e.g. DB_PASSWORD = password
- MySQL database name as DB_DATABASE_NAME. e.g. DB_DATABASE_NAME
= javasalesdashboard
- MySQL database as DATABASE. E.g. DATABASE = mysql
- MySQL database driver as DB_DRIVER. e.g. DB_DRIVER =
com.mysql.jdbc.Driver
- Define the AppFabric settings as described below:
- Use the value of Issuer key (from step 3.j) as SIGNING_KEY. The Signing key will be used by Sales Order Service for token and claim validations.
- Define SERVICE_NAME as SalesOrderService
- Define APPLIES_TO as http://localhost/SalesDashboard/
Now your configuration.properties file will look like this:
- Open the command prompt, change current directory to SalesOrderService project path and run
"ant" command
- Ant Script will generate SalesOrderService.war file in dist/lib directory
- Follow the instructions listed below to configure the Polling Service (creating polling.jar)
- Open eclipse.
- Select new->Java Project.
- Select "Create project from existing source" [shown in image].
- Direct the path to "Polling service" root of demo source code and click finish.
- Make sure that eclipse project is using jdk1.6.
- Right click on the project and select properties
- If the JDK compliance is not 1.6 pl. refer to Eclipse documentation to change it. It will be safe to point to JDK 1.6
- Place the jdotnetservices-v1.0-sdk.jar and commons-codec-1.4.jar files in lib folder under PollingService folder.
- Provide the jar file references to project class-path.
- Right-click project and select properties
- Click on "Java Build Path" and select "Libraries" tag
- Click "Add Jars…" and select above two jars (step
6.e.iii) from lib folder
- Select OK
- Edit PollingService\src\com\persistent\appfabric\config\configuration.properties.
- Set "ISSUER_NAME=owner" in the configuration.properties file.
- Set management key as ISSUER_SECRET
- Your configuration file will look like this
- Provide MANIFEST.MF file for dependencies.
- If such file is not present in the Polling java Project [parallel to
"src" folder], create one with the same name and contents as shown below.
- Export project to polling.jar file.
- Right click the project and select "Export…" option
- Expand "Java" and select "jar", "Click Next>"
- Uncheck .classpath, .project, and other such files
- Provide jar file name and path.
- Click "Next"
- Click again "Next"
- Select "Use existing Manifest file from workspace"
- And browse to the MANIFEST.MF file
- Click Finish
Follow the instructions listed below to configure the Sales Order Client Application (creating ‘SalesOrderServiceClientApp.war’ file)
- Place the jdotnetservices-v1.0-sdk.jar, krysalis-jCharts-1.0.0-alpha-1.jar and commons-codec-1.4.jar files in lib folder under SalesOrderServiceClientApp folder.
- Open and edit SalesOrderServiceClientApp/src/com/persistent/appfabric/sample/salesdataclient/config/ACS.properties as follows:
- Update the proxy settings present in proxySettings.properties file placed under SalesOrderServiceClientApp\src\com\persistent\appfabric\sample\salesdataclient\config folder as per your configuration.
- Open the command prompt and change current directory to SalesOrderServiceClientApp folder and run command
"ant createwar".
- This will create SalesOrderServiceClientApp.war file in SalesOrderServiceClientApp/dist/lib folder.
Follow the instructions listed below to Deploy the SalesOrderService.war and SalesOrderServiceClientApp.war on tomcat server
- Locate the root folder of tomcat installation. [Generally it will be C:\apache-tomcat-6.x.x]
- Copy the "SalesOrderService.war"
and "SalesOrderServiceClientApp.war" files to < tomcat root folder > \webapps
- Start the tomcat server as a service or by running < tomcat root folder >/bin/startup.bat dependeing upon installation of tomcat
Follow the instructions listed below to start the polling service from command prompt
- Change the current directory to the path where polling.jar resides
- Run following command:
java -jar polling.jar < message_buffer_name > start
where message_buffer_name is the Message Buffer that will be used by the polling service
To stop the polling service from command prompt:
Run the command:
java -jar polling.jar < message_buffer_name > stop
Run the client as
http://localhost:8080/SalesOrderServiceClientApp/pages/
[replace 8080 by port if tomcat uses different port than 8080]
|
|
|
|
|
|